Macrame Keychains: A DIY Project You Can Make in Under an Hour
Macrame keychains are a fun way to learn some basic macrame techniques. You probably won’t be able to make anything that looks like a professionally-made accessory, but at the same time you’ll be so proud of yourself for completing something that will come in handy when you need it most.
It’s a DIY project that can be finished in under an hour – as long as you know what you’re doing. If you’ve ever attempted macramé before and found it quite challenging, don’t worry! The best thing about these keychains is that they’re very simple and straightforward – without any obscure knots or twists.
Even if you haven’t done any kind of macramé before, with a little bit of practice (and maybe one or two failed attempts), you can master this project in no time!


What You’ll Need to Make a Macrame Keychain
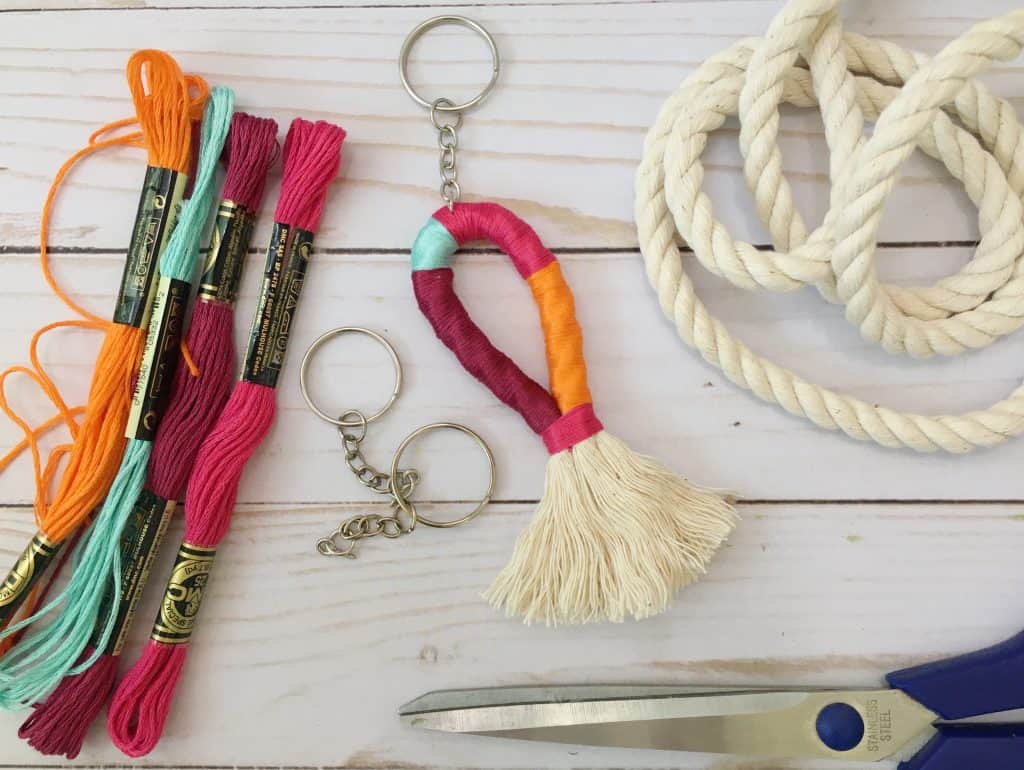
– A macrame loom: you can buy these at craft stores, but you can also make the loom yourself using a piece of cardboard, a pencil, and some strings or yarn.
– String or yarn to use as the tying threads – these can be any colours you want, as long as you use a variety for the different tying threads.
– Scissors to cut the string or yarn once you’re done weaving.
– A keychain: you can buy these or use the one that came with your house keys. You can also add beads to your macrame keychain if you’d like to make it look a little bit fancier. You’ll need a needle to string the beads onto the tying threads and a pair of scissors to cut the excess thread length when you’re done.
Step 1: Create the Basic Shape
First off, you’ll want to create the basic shape of your macrame keychain. Make sure that the shape is nice and squared so that it sits on a table without wobbling. The best shape for macrame keychains is a square, which means you’ll need to use four tying threads.
If you want your macrame keychain to have rounded edges, you could use either four or eight tying threads. The square shape is much easier to finish, though, and you can make it whatever size you want. Once you have the basic shape, you can start weaving the first row of knots. This row is called the “foundation” row and will determine how the rest of the macrame keychain will look.
Step 2: Add the Tying Threads
Next up, you’ll want to add the tying threads. You can either choose to follow the colour theme of your macrame keychain or just pick a bunch of colours that you think go well together. The tying threads will form rows on the back of the keychain, and you’ll want to make sure to keep the rows nice and evenly spaced.
For the first row, you’ll want to use at least six tying threads. The remaining rows can be made with four tying threads each, so you’ll need to account for that extra tying thread in the first row.
Once you’ve added the tying threads, you’ll have to weave the first row of knots across the back of the keychain. This first row will serve as the “weaving thread” for the rest of the weaving – so make sure it’s nice and even!
Step 3: Create the Loops for Your Keys
Next up, you’ll want to create loops for your keys on the front of the keychain. If you want your keychain to have two loops, start weaving the second row of knots on the back of the keychain. If you want your keychain to have three loops, weave the third row of knots on the back of the keychain.
If you want your keychain to have four loops, weave the fourth row of knots on the back of the keychain. If you want your keychain to have five loops, weave the fifth row of knots on the back of the keychain. You’ll want to make sure that the loops are even, so weave slowly and carefully. You don’t want your weaving to be uneven because it will mess up the entire look of your macrame keychain.
Step 4: Final Touches
After that, you just need to add the finishing touches to your macrame keychain. Once you’ve woven the last row of knots on the back of your keychain, you can go ahead and cut the tying threads. Next up, you can go ahead and weave the last row of knots on the front of the keychain.
If you added four or eight tying threads to start with, you’ll have to weave half or a quarter of the last row of knots with each of those tying threads. After that, you can go ahead and cut the weaving threads. Cut them as close to the knots as you can without cutting through them, which is the best way to avoid messy fraying.
Conclusion
Macrame keychains are a fun and easy macrame project that you can do with kids, friends, or even on your own. You can use whatever colours you want and add beads to fancy them up, so you can make macrame keychains that fit with almost any style.
At the same time, macrame keychains are a great beginner project that will help you improve your macrame skills. They’re a project that will take you less than an hour to complete, and that makes them perfect to do while you’re watching TV or while you’re on a bus or train ride.
If you’ve ever wanted to learn how to make macrame, these keychains are a great place to start. Once you’ve mastered this project, you can move on to more advanced macrame and try out a range of different patterns.